If you want to build a shed in your backyard, you have to start with a shed floor. Building a shed floor is a job that can be done within a day or two. From beginning to end, it is a way to save money on your shed project. Making sure you have the right materials, instructions, and a friend to help if needed, you can have it done in no time!
What is the best flooring for a shed?
Your shed floor choice will depend a lot on the type of shed you’re building. If you’re planning on storing heavy items in your shed, you’ll need a sturdy base and even flooring. A durable shed will also need a foundation because if you put a shed on bare ground, it will start rotting over time.
When it comes to the best shed floor materials, you have several options:
- Concrete is the most durable option, albeit being expensive. The sturdiness and hardness of concrete can be hard on your feet over a long period of time using the shed. It will also be challenging to remove if you decide to relocate your shed.
- Pressure-treated plywood flooring is a durable and relatively inexpensive option for your shed. It’s undoubtedly one of the best flooring options (and that’s why we’re using it for our building guide). Pressure-treated plywood is also water and rot-resistant.
- OSB flooring is by far the cheapest option out of the three but it’s not the smartest choice for rainy locations, as it has issues with water resistance.
The shed floor building guide we shared is for a sturdy and durable shed with a foundation.
What is the cheapest way to cover a shed floor?
OSB (Oriented Strand Board) is by far the cheapest option for shed flooring because it uses leftover wood material. It’s sturdy and is easy to use for large or odd-sized sheds because it doesn’t require a lot of joints on the floor.
However, OSB is not 100% water resistant and can swell when in contact with water.
What are some shed floor covering ideas?
There are multiple options to consider when it comes to shed floor covering. Here are some examples:
Plywood
A classic and good-looking option is plywood. If it’s pressure-treated, it also becomes moisture resistant, therefore, is a great choice for rainy and snowy climates. Plywood is also easy to clean and doesn’t require a lot of maintenance.
Linoleum
Linoleum is a budget-friendly option for your shed. It might seem unusual at first but linoleum is durable, versatile, and easy to take care of. However, it might not be suited for storing very heavy items as linoleum can scratch.
Interlocking tiles
It’s a versatile option that offers a little bit of a different look than plywood or linoleum. Tiles are easy to install and can be mixed and matched to create a unique look for your shed. They’re also easy to maintain as they don’t absorb moisture and dirt.
Horse stall mats
Maybe not the most attractive option but horse stall mats are affordable, easy to install, and non-slip. They’re great for outdoor sheds as the material is quite durable and doesn’t require any adhesive. Horse stall mats are a smart option for cold and damp climates.
Vinyl
Vinyl has become quite a popular flooring option – and for a reason. It’s water-resistant, durable, affordable, and easy to clean. This shed flooring option can withstand almost any weather and doesn’t require adhesive to be installed.
How to build a shed floor
Step 1: Check the Town’s Construction Codes
Checking construction codes is an important step to do before beginning your shed floor. This will tell you what kind of anchoring your shed will need. You can anchor your shed in a couple of different ways. Those are by using cable tie-downs anchored to the ground or by fastening your floor to concrete posts that are put into holes dug in the ground. This choice could be dependent on things like the area weather or the size of your shed.
Step 2: Prepare All Materials
You want to make sure you have everything you need ahead of time.
So what materials should you use for a shed floor?
- Pressure-treated lumber
- Pressure-treated plywood
- Joist hangers
- Fasteners (framing nails and exterior grade screws)
- Wood screws
Recommended tools to have on hand are:
- Level
- Chalk line
- Tape measure
- Speed square
- Circular saw
- Nail gun
- Palm nailer
- Safety gloves
- Safety glasses
- Miter saw
- Jigsaw
- Carpentry pencil
Step 3: Lay Out Deck Blocks
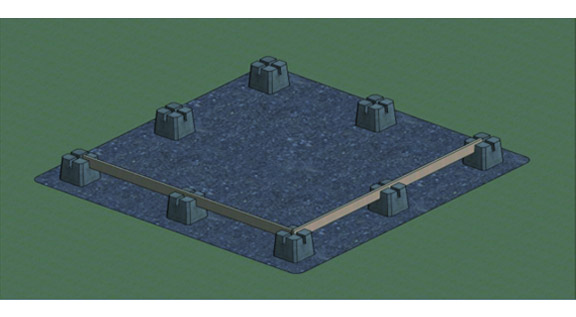
- Place your deck blocks down so they are equally distant apart from each other. There should be one about every 4 to 6 feet. This will help stabilize the whole floor.
- Lay 2x6s in the grooves of the deck blocks.
- Tamp down and dig the ground. This will help make the ground level and give the floor frame good support.
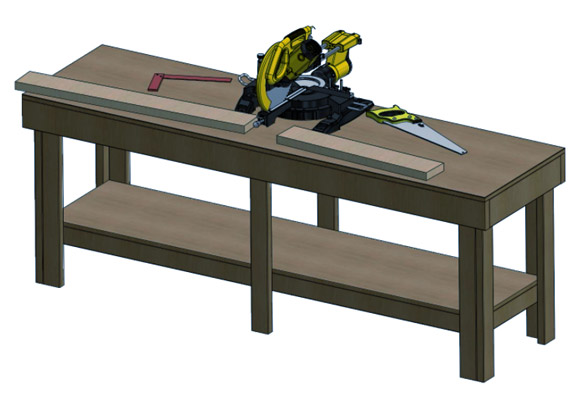
Step 4: Mark the Two-Band Boards
The amount of lumber you will need is determined by the size of your shed floor.
- Prepare two joists and two rim joists according to the length and width of your shed. Pay attention that if the length of the rim joists is equal to the length of the shed, in order to calculate the length of the joists, you need to subtract the thickness of the front and rear rim joists from the shed width value.
- Using a speed square, mark where your cuts need to be.
- Cut your lumber according to your measurements using a miter saw, chop saw or circular saw if needed.
- Make sure you seal the grain cut ends with a wood preservative.
Double-check your measurements before you cut. This will save you from potentially making wrong cuts later, saving you time and money.
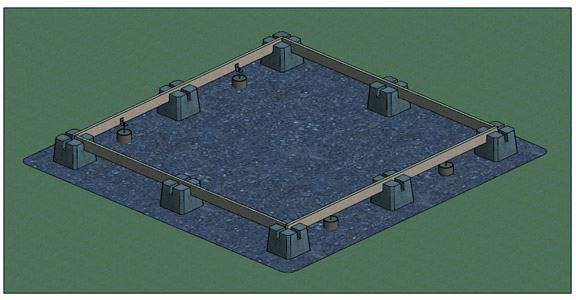
Step 5: Put the Outer Frame Together
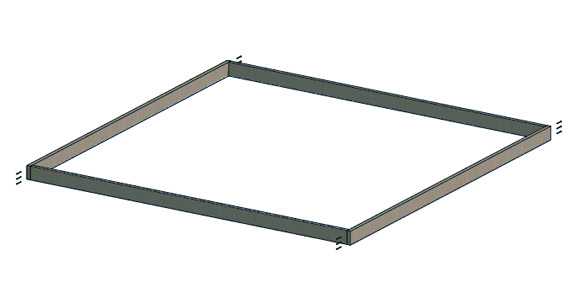
Assemble the outer frame joists and fasten them by using 3 nails
After you have finished your cuts for the shed floor, it’s time to put the outer frame together.
- Nail the frame together by using 3” 16d framing nails.
- Join every board together: one on the top, one in the middle, and one on the bottom for each.
When you are finished with these four, you should have formed a box.
Step 6: Square the Floor Frame
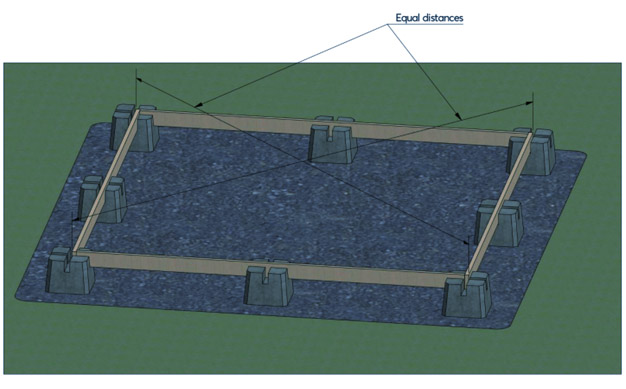
- Measure diagonally from one corner to another using a tape measure.
- Do this for both sets of corners.
- Make sure the measurements are equal. If it isn’t, hammer the longer corner a bit. Sometimes, a shift deck block may be necessary.
- Keep adjusting until the measurements square up.
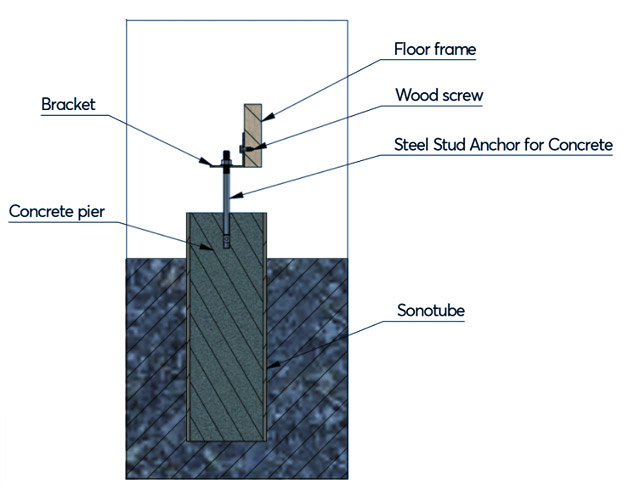
Step 7: Anchor Floor Frame
After you have determined the location of all the blocks, you need to prepare the foundation for fixing the frame. It is probably best to anchor your shed with concrete piers.
- With spray paint, mark under each corner where you want your anchors to be. Depending on the size of your shed, you should only need one in each of the corners.
- Dig holes on your 4 marks.
- Install the fiber-form tubes into the hole so that the top edge is 4 inches above the ground.
- Level this off and then fill each hole with concrete.
- When the concrete is cured, install a bracket on the inside of the frame and fix it with an anchor to the foundation.
- Repeat the procedure for all prepared foundations.
Step 8: Add Rim Joists
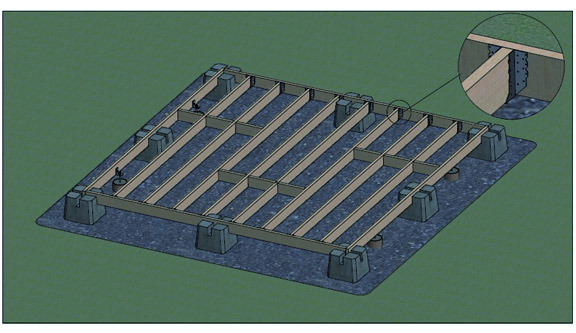
- Cut these joists the same as above using the speed square. This is where having a square frame is particularly helpful.
- After all of these are cut, place them inside the frame. They should all sit 12”-16” in the center.
- Calculate the step between the rim joists as a multiple of the sheet width and, if necessary, move them under the joint of the sheets.
- Mark the increments along the length of the frame on both sides. Where the center of each joist will go is what needs to be marked.
- Attach joist hangers using Simpson screws to the frame. You have to make sure the joists are flush with the top of the frame.
- Put the joists into the hangers. If it’s a little tough, use a hammer to tap them down.
- Use 3” nails to attach the hangers to the joists. These nails should go in on an angle so they can go through the joist and the frame. For larger sheds, it’s a good idea to have a middle support beam that runs perpendicular to your joists.
- Cut 2×6 blocks and insert them at 4’ and 8’ distances from the outside of your frame to prevent them from twisting. This will also provide extra support for the edge of your plywood for your shed floor.
Step 9: Lay Out the Sheeting
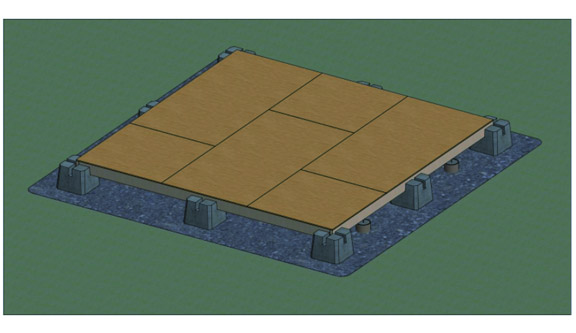
- Cut your plywood to the length and width you need for your shed floor frame.
- Lay it down and make sure it’s even before you start screwing it down. It will help if you snap a chalk line where the joists are. This will make it easier when you need to screw into the joists.
- For uniformity and stability, place the screws about 8” apart. Where two pieces of the wood meet, use two screws on each piece of plywood. These won’t back out of the wood. They also help keep the floor from squeaking and getting bumps.
Conclusions
Making your shed floor can be a fun and fairly simple way for you to save some money. Make sure you are double-checking yourself (especially measurements) so you don’t have to go back and correct something down the road. A well-built shed floor will last for a long time and now it’s time to learn everything about wall framing.It’s not that difficult and it won’t be long and you’ll have a beautiful shed that fits your needs.
 Joseph Truini is a host on the Today’s Homeowner TV show and co-hosts the weekly Today’s Homeowner Radio Show. He has written three best-selling shed-building books and lives in Roxbury, Connecticut.
Joseph,
Just reviewed your skid foundation and I transitioned to the floor build on the link you provided. I’m not understanding the use of blocks for the flooring in conjunction with the skid foundation. Could you help me?
Thanks!
Your information was very useful. Thank you for your knowledge.
My friends built the shed before the foundation, how do we put a floor in?
Good evening sir my name is Mario I live in Texas just wanted to ask you how far is the spaceing on a 40×40 house on pier and beam and what size of bords do I use for the bottom form before the plywood.