Exploring shed siding options can be pretty daunting as there is no one correct answer. The siding you choose depends highly on climate conditions, your budget, needs, and aesthetic preferences. In this article, we aim to provide you with succinct and accurate information on the most popular shed siding options, weighing pros and cons of each. We’ll start from explaining what you should consider when choosing shed siding, and then go into our hand-picked options and their characteristics.
What to Consider When Choosing Shed Siding
There are a lot of different factors to consider before you purchase siding for your shed.
Water resistancy
Will the shed be water resistant? Water damage is extremely expensive to repair. You’ll want to make sure the siding overlaps so that the seams and joints are protected from moisture.
Cost efficiency
What is the cost? You’ll definitely want to keep your budget in mind before you make a decision on siding.
Aesthetics
Is it aesthetically pleasing? Are you trying to build a shed that matches your home? That’s what many homeowners have in mind. But even if it doesn’t match, you’ll want to make sure it looks nice in your backyard.
Durability
Is it durable? Find out how long the siding is expected to last, how much maintenance will be required and if it will do well in the elements where you live.
Ease of installation
Can you install it yourself? This is important, especially if you are building your shed yourself. If you need a professional to install it, it might not be the best fit for you.
Best Shed Siding Options
As we’ve already mentioned, when choosing shed siding materials, it’s important to consider water resistance, durability, aesthetics, cost, and ease of installation. Let’s explore the best available options that meet those expectations.
Vinyl Siding
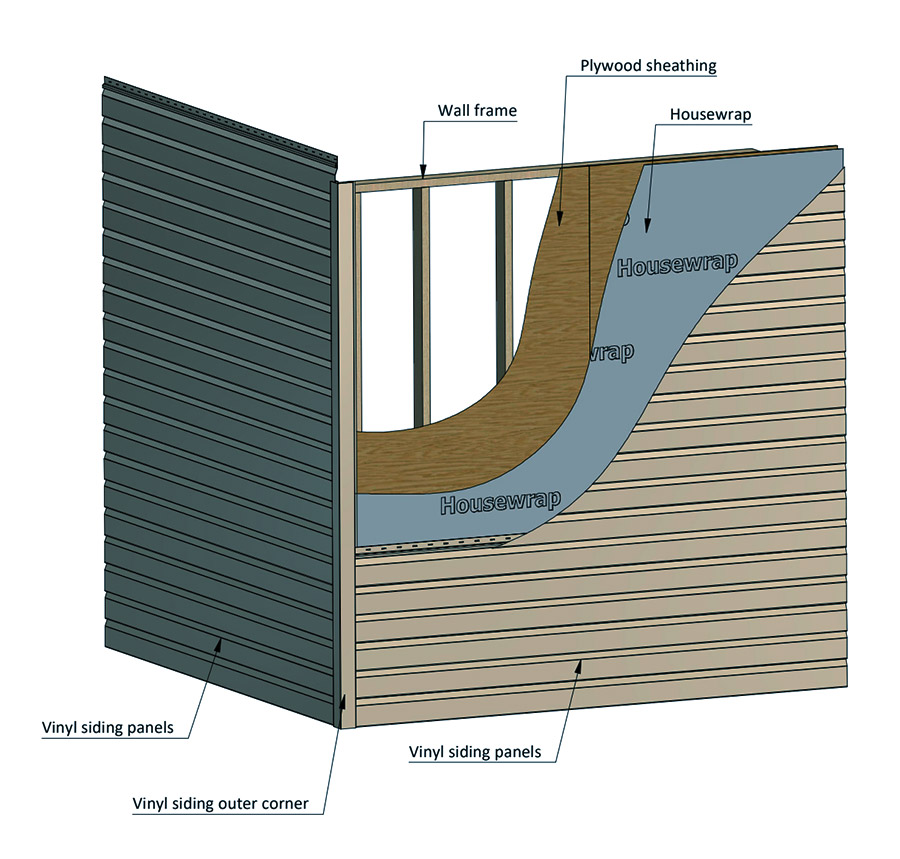
The vinyl siding really enhances the visual beauty of your shed. It is extremely durable, water resistant, and it really doesn’t require much maintenance at all. All you need to do is clean any accumulated dust and debris. Vinyl offers a large selection of color options, so homeowners should be able to match their homes’ siding easily.
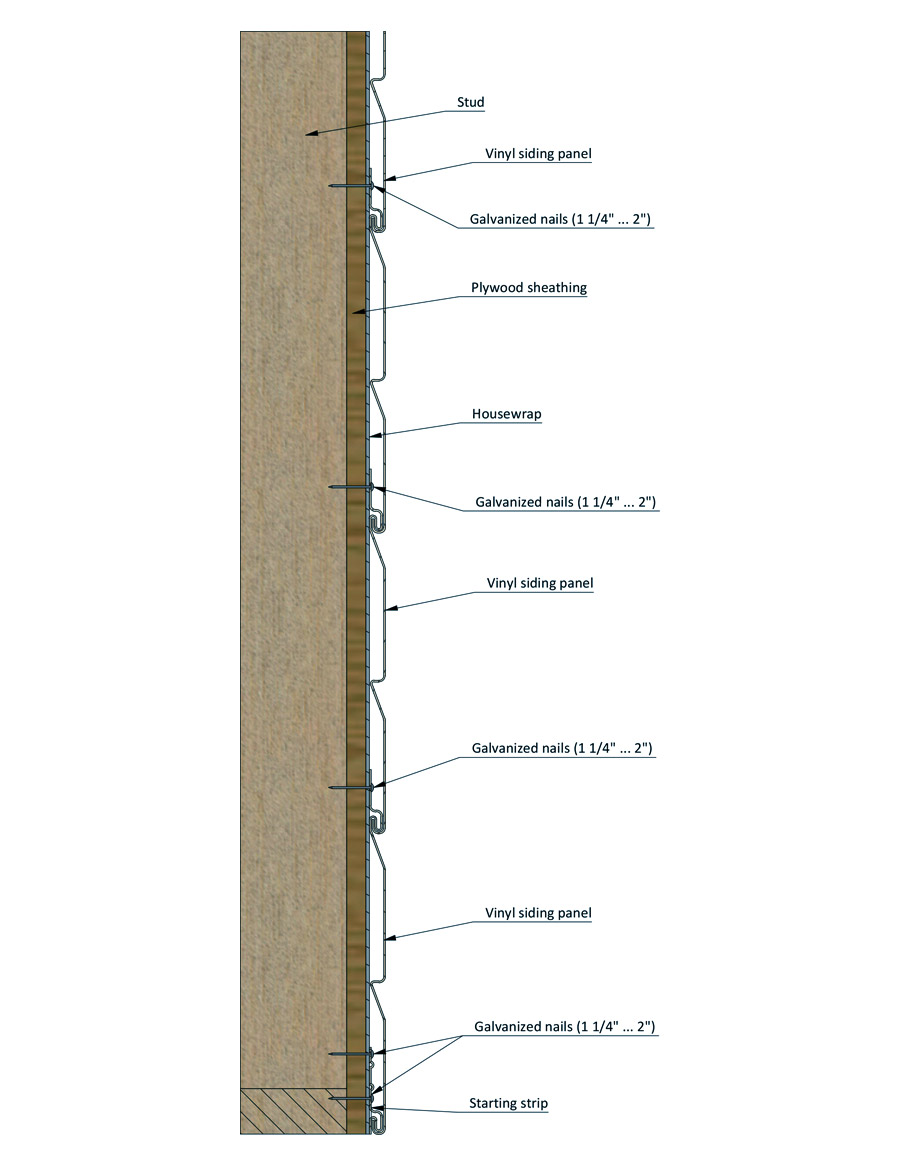
Composed primarily of plastic materials, vinyl siding is highly moldable, allowing for versatile design possibilities. Beyond its color diversity, as we’ve already mentioned, vinyl siding presents various style choices, encompassing both vertical and horizontal plank configurations. Best of all, vinyl is really easy to install, so this is great for people who are building their sheds themselves.
One of the downsides, however, is the fact that vinyl siding doesn’t insulate your shed from cold. Should you seek to maintain a warmer interior in colder climates, additional insulation measures may be required.
Tip: Follow the manufacturer’s recommended guidelines for nail placement when installing vinyl siding on your shed.
Bevel Siding
Bevel siding, also called clapboards, come in long, thin planks that are nailed horizontally to exterior walls. It’s called bevel siding because the boards are milled at a slight bevel angle to produce planks that are thinner at one edge than the other. As each course of siding is nailed up, the thin upper edge is overlapped by the thicker bottom edge of the course above it, creating a weather-resistant, water-shedding surface.
Bevel siding is typically milled from Western red cedar or redwood, two softwood species that are naturally resistant to rot and wood-boring bugs. But, spruce, cypress, and pine versions are also available. Bevel siding comes in several grades, from clear to knotty, and is often smooth on one side and rough sawn on the other. If you’re going to paint the siding, install the smooth side facing out. For a stained finish, install the rough side out; the stain will soak much deeper into the rough-sawn surface.
Tip: When installing bevel siding, be sure to drive the nails through the plywood sheathing and into the wall studs. Otherwise, the nail tips will protrude into the shed’s interior, creating dozens of pointy, painful hazards.
Plywood Siding (or T1-11)
There are two excellent reasons why plywood siding is a popular option for shed builders: it’s very affordable, and it covers a lot of area very quickly. Exterior-grade plywood siding comes in 4×8-foot sheets and is 5⁄8 inch thick. It’s available in several styles, including rough sawn, primed, and unprimed. However, the most popular style by far is grooved plywood siding, which commonly called, T-1-11, a trading name of Georgia Pacific. This type of siding has a rough-sawn surface that features a series of equally spaced 3⁄8-inch-wide grooves. The grooves are spaced either 4 inches or 8 inches apart. Plywood siding is nailed directly to the wall framing. Shallow rabbets milled into the edges of the sheets overlap one another to lock out the rain.
Tip: Before nailing up plywood siding, run a bead of construction adhesive along every stud. That way, if the studs shrink slightly or the nails pull loose, the siding will remain stuck in place.
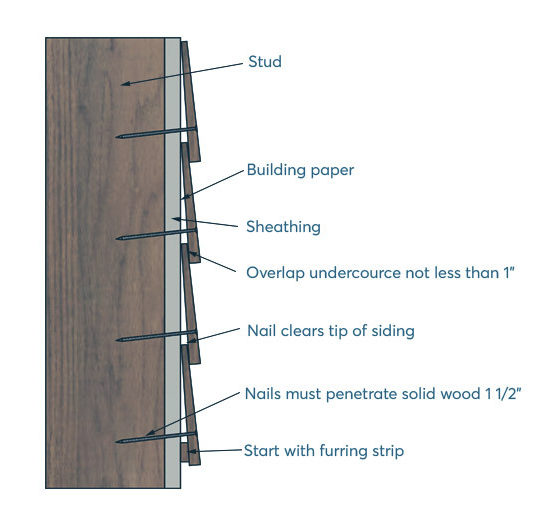
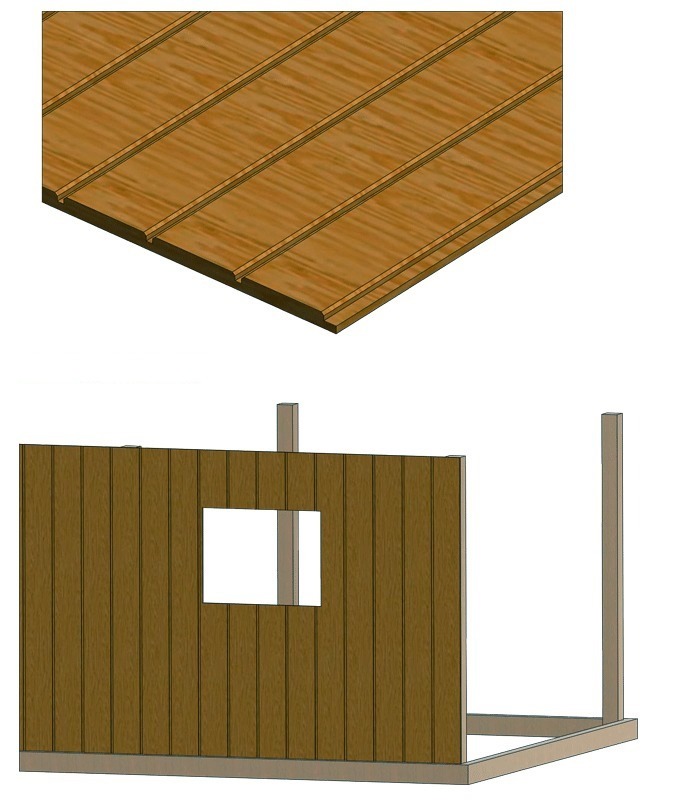
Tongue-and-Groove Boards
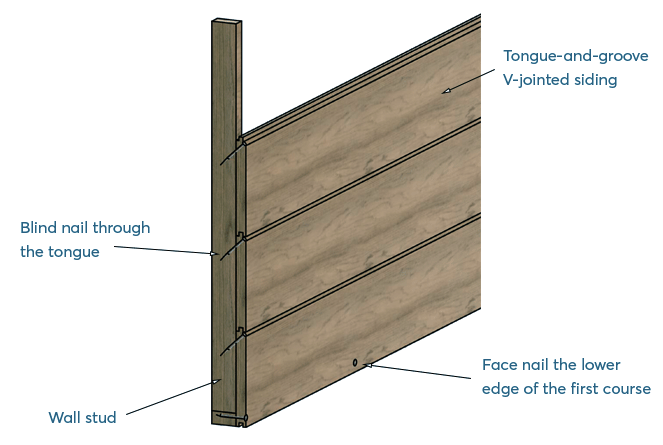
The term, pattern siding, refers to several types of wood siding that feature interlocking or overlapping joints. The most popular type of pattern siding is called V-jointed tongue-and-groove siding. Each 3/4-inch-thick board is milled with a tongue along one edge and a groove along with the other. When the boards are nailed up, the tongue of one board fits tightly into the groove of the adjacent board. The edges of the boards are also chamfered at a 45º angle, creating a decorative V-shaped joint along each seam. This type of siding can be installed vertically, horizontally, or diagonally.
Tongue-and-groove siding can be nailed directly to the wall framing; there’s no need to first sheathe the walls with plywood. And although you can simply face-nail the siding to the framing, tongue-and-groove boards look best when the nails are driven through the tongue and then covered by the grooved edge of the next board. This technique is known as blind nailing because upon completion all the nails are hidden from view.
Most tongue-and-groove siding is milled from Western red cedar or redwood and has either a smooth or a rough-sawn surface. You can also buy tongue-and-groove boards made from untreated pine, but be aware that it’s susceptible to rot. Be sure to protect pine siding with a coat of stain or paint.
Tip: Tongue-and-groove siding is commonly available in 4-inch-, 6-inch-, and 8-inch-wide planks. Choose the 4- or 6-inch siding for small- to medium-size sheds; 8-inch siding looks best on larger sheds.
Metal Siding
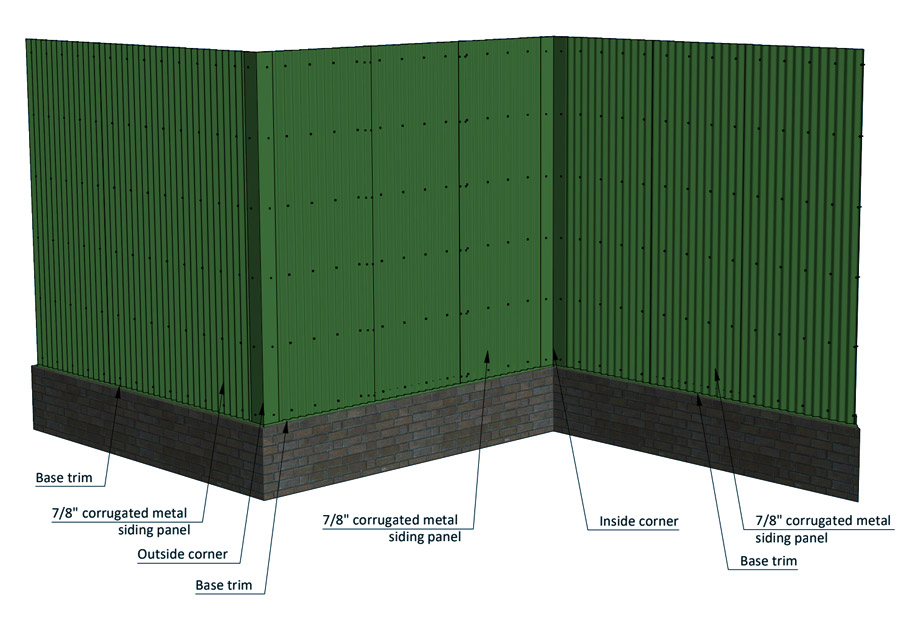
Metal is one of the most durable siding products on the market. In many ways, it outperforms vinyl because it can withstand any weather condition. It is also extremely energy efficient as well, making it one of the most environmentally friendly options. Maintenance is simple because of the fact that metal is resistant to warping, chipping or fading. The most you will need to do in many cases is give it a good rinse with the hose to keep it clean.
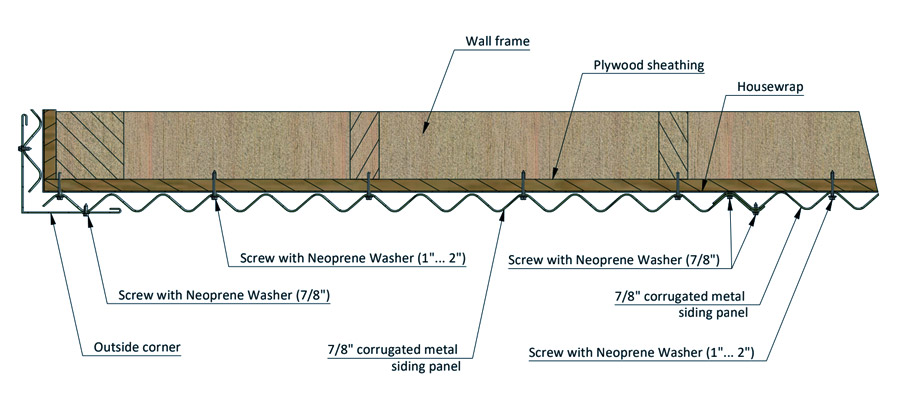
Metal siding is also easy to install. Generally, metal shed siding offers way more pros and cons, and is a great option for those that want a low-maintenance option that’s insect, water and fire resistant. Metal is also great for windy and stormy climates as it can withstand harsh weather conditions without damage.
Tip: When it comes to siding for your shed, metal panels are typically installed vertically. That being said, you can also opt for a horizontal or diagonal arrangement by using interlocking planks for a unique and visually appealing look.
Board-and-Batten Siding
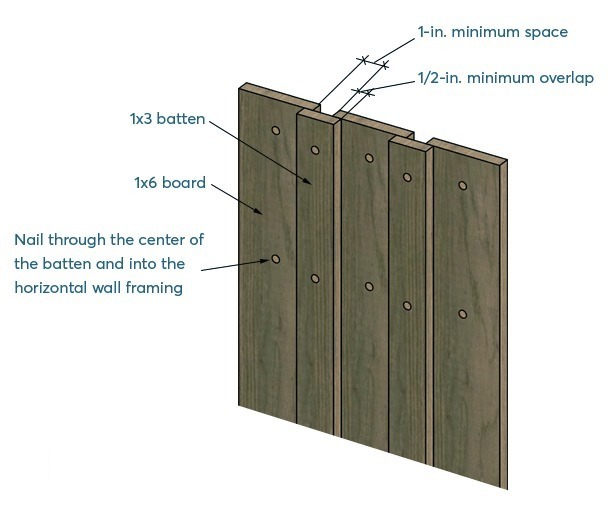
Board-and-batten siding represents one of the oldest and most traditional styles of wood siding. It consists of wide boards and narrow wood strips, called battens. The boards are nailed vertically to the wall framing, and then battens are used to cover the vertical seams between the boards. Unlike other types of wood siding, there’s no standard size for board-and-batten siding. You can make it from virtually any size lumber. However, the battens are usually cut from 1x3s and the vertical boards are cut from stock ranging from 1x8s to 1x12s. For best protection against rot and insects, cut the siding from red cedar, redwood, or pressure-treated lumber. When installing the boards, leave a 1-inch space between them so they can expand without buckling. And when you nail up the battens, make sure they overlap the boards by at least 1/2 inch to provide adequate coverage in case the boards shrink.
Tip: If the siding boards are 6 inches or narrower, fasten each one with a single row of nails driven through the middle. If the siding is 8 inches or wider, attach it with two, equally spaced rows of nails.
LP Smartside Siding
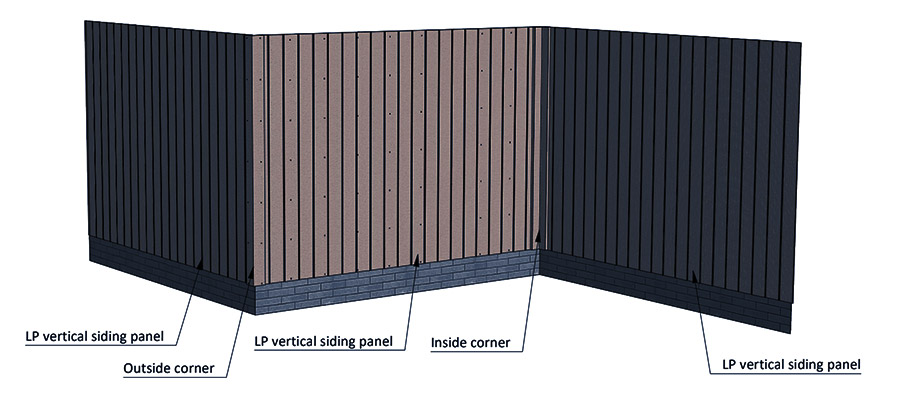
If you love the look of traditional wood siding but you want better durability, LP siding might be the best option for your shed. For better protection from decay and insects, zinc borate is added to the material. LP siding gives your shed a beautiful, clean appearance, and it also keeps the inside of the shed much cooler than other materials.
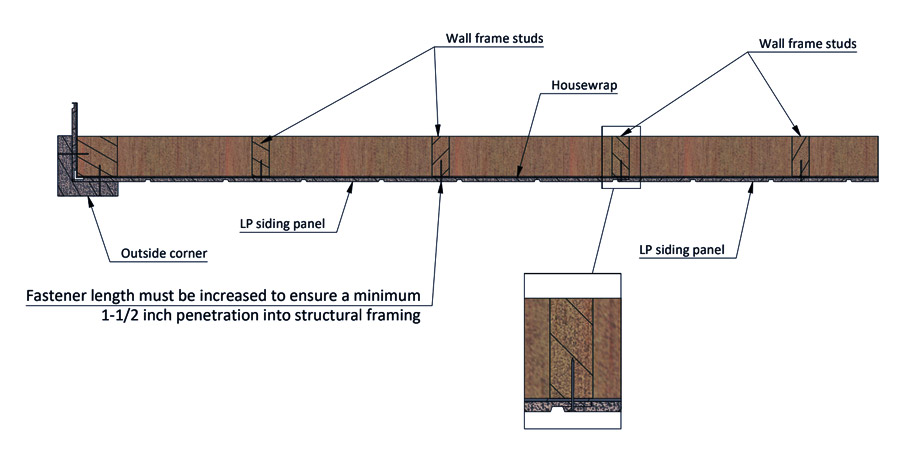
It is easy to install, and it may also be cheaper than many other types of siding because of its lightweight materials. However, it requires more maintenance than other materials and might need repainting every 5 or so years.
Tip: Prime or paint exposed edges with acrylic latex for better protection against various damage that can appear over time.
Cedar Shingles
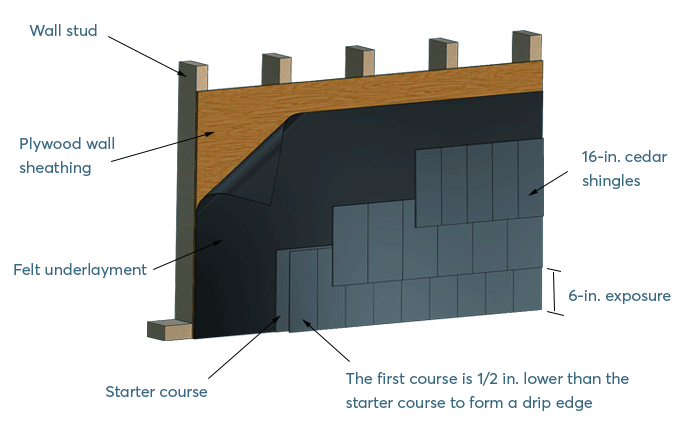
If you’d like your shed to resemble a quaint country cottage, side it with cedar shingles. The individual shingles are installed in overlapping courses, which do an excellent job of shedding rainwater. And the nails in each course are concealed by the shingles in the course above it, so the siding has a very neat, clean appearance. Shingles aren’t quite as popular as other types of wood siding because they’re rather time-consuming to install and relatively expensive. Also, shingles can’t be nailed directly to the wall framing; you must first install plywood sheathing. Cedar shingles can be finished with exterior-grade paint, clear wood preservative, semitransparent stain, or solid-color stain.
Tip: If you like shingles, but would prefer a rougher, more rustic look, consider installing hand-split cedar shakes. Shakes are similar to shingles, but they’re cut much thicker and are much more heavily textured.
It’s Time to Add Siding to Your Shed
Now that you have more information about siding, it’s time to make your decision. We can’t tell you which option is the best and most suitable for you as it depends on your budget, the climate you live in, and the aesthetics you’re going for. So which type of siding is right for you and your needs? No matter which one you choose, if you do it right, you’re going to love the final outcome!
 Joseph Truini is a host on the Today’s Homeowner TV show and co-hosts the weekly Today’s Homeowner Radio Show. He has written three best-selling shed-building books and lives in Roxbury, Connecticut.
Hi I’m going to get a wooden shed soon how do I put a flower pot under the window. So basically what hanging tools can I use?