Here, I’ll discuss the three most common techniques used to build shed walls: stick-built, post and beam, and pole barn. Before getting into the specifics, it’s worth mentioning that most shed walls are stick-built out of 2-by construction lumber, and it’s easy to see why: Stick-built construction is fast, affordable, and straightforward.
However, if you’re planning to use your shed for something other than storage—perhaps as a workshop, writer’s studio, or home office—then consider a post-and-beam building, which has exposed timbers that lend a handcrafted look to the interior.
In a pole-barn building, the walls are fastened to a series of tall poles that support the entire structure. The wall-framing technique used is dependent on whether the building has round poles or square posts, and your choice of siding material.
Planning and Measuring
- Step 1 – Mark the lines for the wall on the floor. Once you sweep the shed floor, measure 3.5 inches from the edges of the floor and mark that spot. Repeat this on all sides of each of the four corners.
- Step 2 – Cut the wall plates and align them with the marks you just made on the floor. Double-check the dimensions on your shed plan and then cut the wall plates to the appropriate length. You will only need to cut two plates for each wall for now. Line up the wall plates with their marks on the shed floor, making sure the ends of the boards are flush. The corners should meet the adjoining walls and line up with the wall marks.
- Step 3 – Mark the wall stud layout and door opening on the wall plates. You’ll need to mark the wall plates to indicate the wall stud and doorway locations. Check your shed plan to make sure you have accurate measurements.
Stick-Built Walls
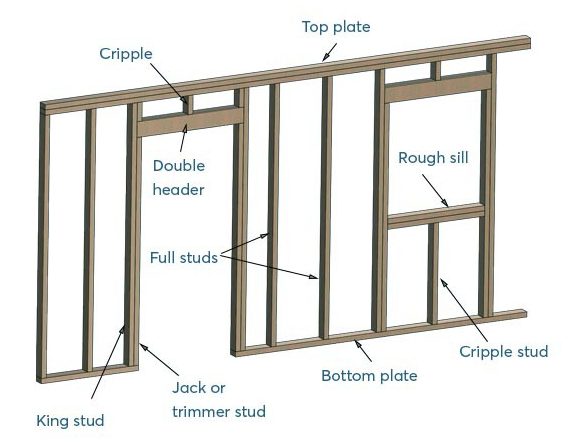
The term stick-built refers to the fact that the walls are constructed out of individual “sticks” of lumber: usually 2x4s or 2x6s. A typical wall frame consists of horizontal top and bottom plates, vertical wall studs, rough sills that establish the bottom of the window openings, and horizontal headers that are installed above each window and door opening. You can use standard construction lumber for building walls; Douglas fir, hemlock, and spruce are all fine. However, it’s important to use pressure-treated lumber for any framing member, such as the mudsill, that comes in contact with the ground or a concrete foundation.
Tip: Save time by assembling the wall frames on a flat surface, like on the shed floor. Then stand up the walls and screw them down to the floor and to each other in each of the four corners.
Post-and-Beam Walls
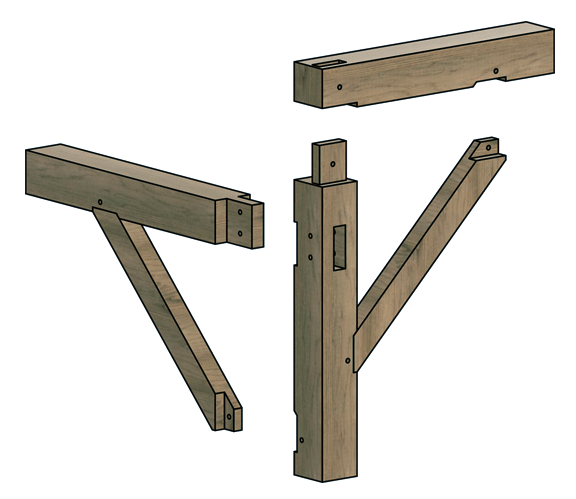
This framing method uses large vertical posts and horizontal beams to form the skeletal frame of the walls. A post-and-beam wall has far fewer parts than a stick-built wall, but the parts are larger, so they’re a lot heavier and more difficult to lift into place. The wall frame of a post-and-beam shed is usually cut from 4x6s, 6x6s, or 8x8s.
The traditional way to join the posts to the beams is with mortise-and-tenon joinery. Each joint consists of a recessed slot (mortise) and a protruding tab (tenon). Mortises are cut by first drilling out the waste wood and then squaring up the hole with a mallet and chisel. Tenons are typically cut with a portable circular saw and a handsaw. A post-and-beam wall can be covered with plywood sheathing and then siding, as is normally done. Or, the siding can be set within the wall frame, leaving the posts and beams visible from both inside and out of the shed.
Tip: Post-and-beam wall frames can be joined together without mortise-and-tenon joints by using special metal fasteners, including saddles, beam connectors, and post caps.
Pole-barn Framing
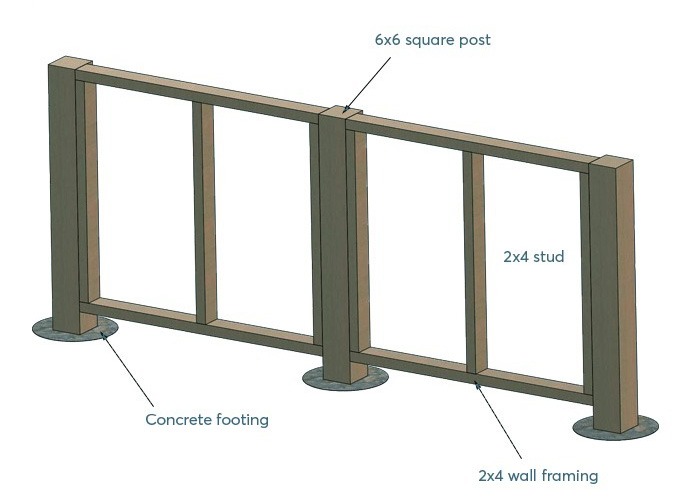
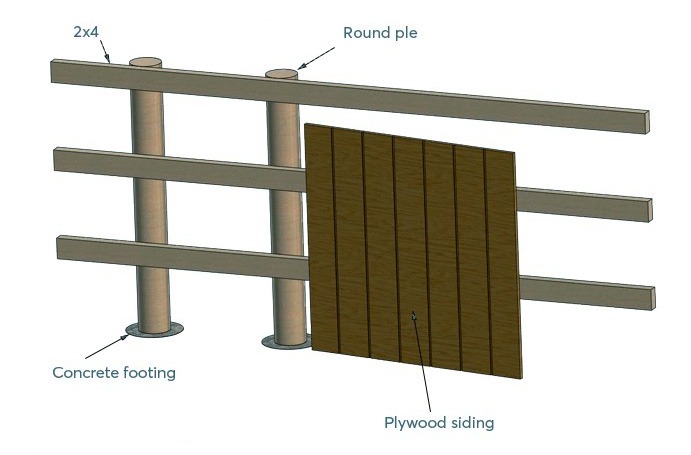
As mentioned earlier, the wall framing used for a pole barn depends on whether the building has round poles or square posts. For round poles, simply attached three equally spaced 2×4 or 2×6 nailers horizontally across the poles. Then, fasten the siding to the nailers. If the building has square posts, you have two options: Nail 2x4s or 2x6s across the posts, or build framed sections out of 2x4s and set them between the posts.
Tip: Set the poles into the holes, allowing them to extend higher than necessary. Then, attach the wall frames and use a handsaw to trim the top of each pole flush with the top of the wall.
Positioning and Attaching the Wall
Your shed walls are going to attach to the floor as well as to each other. When you secure them to the floor, you’ll nail or screw the bottom plate of the wall into the floor joists. It’s best to use a four stud corner (this is sometimes referred to as a three stud corner) when you attach the corners of the walls together.
The four stud corner is actually a block of three studs together at the end of the wall. It provides plenty of space for fasteners to attach securely. You might even want to consider using scrap pieces of 2×4 as you build your blocks. This can save you on your materials cost.
Shed Wall Framing Made Easy
We hope that this guide has broken down the steps of wall framing to help you get started with this part of your shed. With a little more work and perseverance, you’ll soon have a shed you and your family will be proud of.
 Joseph Truini is a host on the Today’s Homeowner TV show and co-hosts the weekly Today’s Homeowner Radio Show. He has written three best-selling shed-building books and lives in Roxbury, Connecticut.
I spent forever looking for suggestions on round pole wall framing, many discussed pros and cons, but no one explained how. I found shedplans.org and you explained it so well and in such simple terms. Much thanks Mr Truini, I think my next search will be for one of your books!